Friday, February 25, 2011

At work


I work at the Jožef Stefan Institute in Ljubljana, Slovenia, in the Department of Surface Engineering and Optoelectronics. But don't let the title mislead you, I'm still a mere student. I took this job only because it sounded interesting and I have some free time to kill.

So what exactly is my job? I am studying the effect of plasma on the physical properties of polymers. More specifically, how plasma affects the surface energy of a polymer. I'm sure you have long forgotten everything about plasma and polymers, so here's a short reminder.

Plasma.

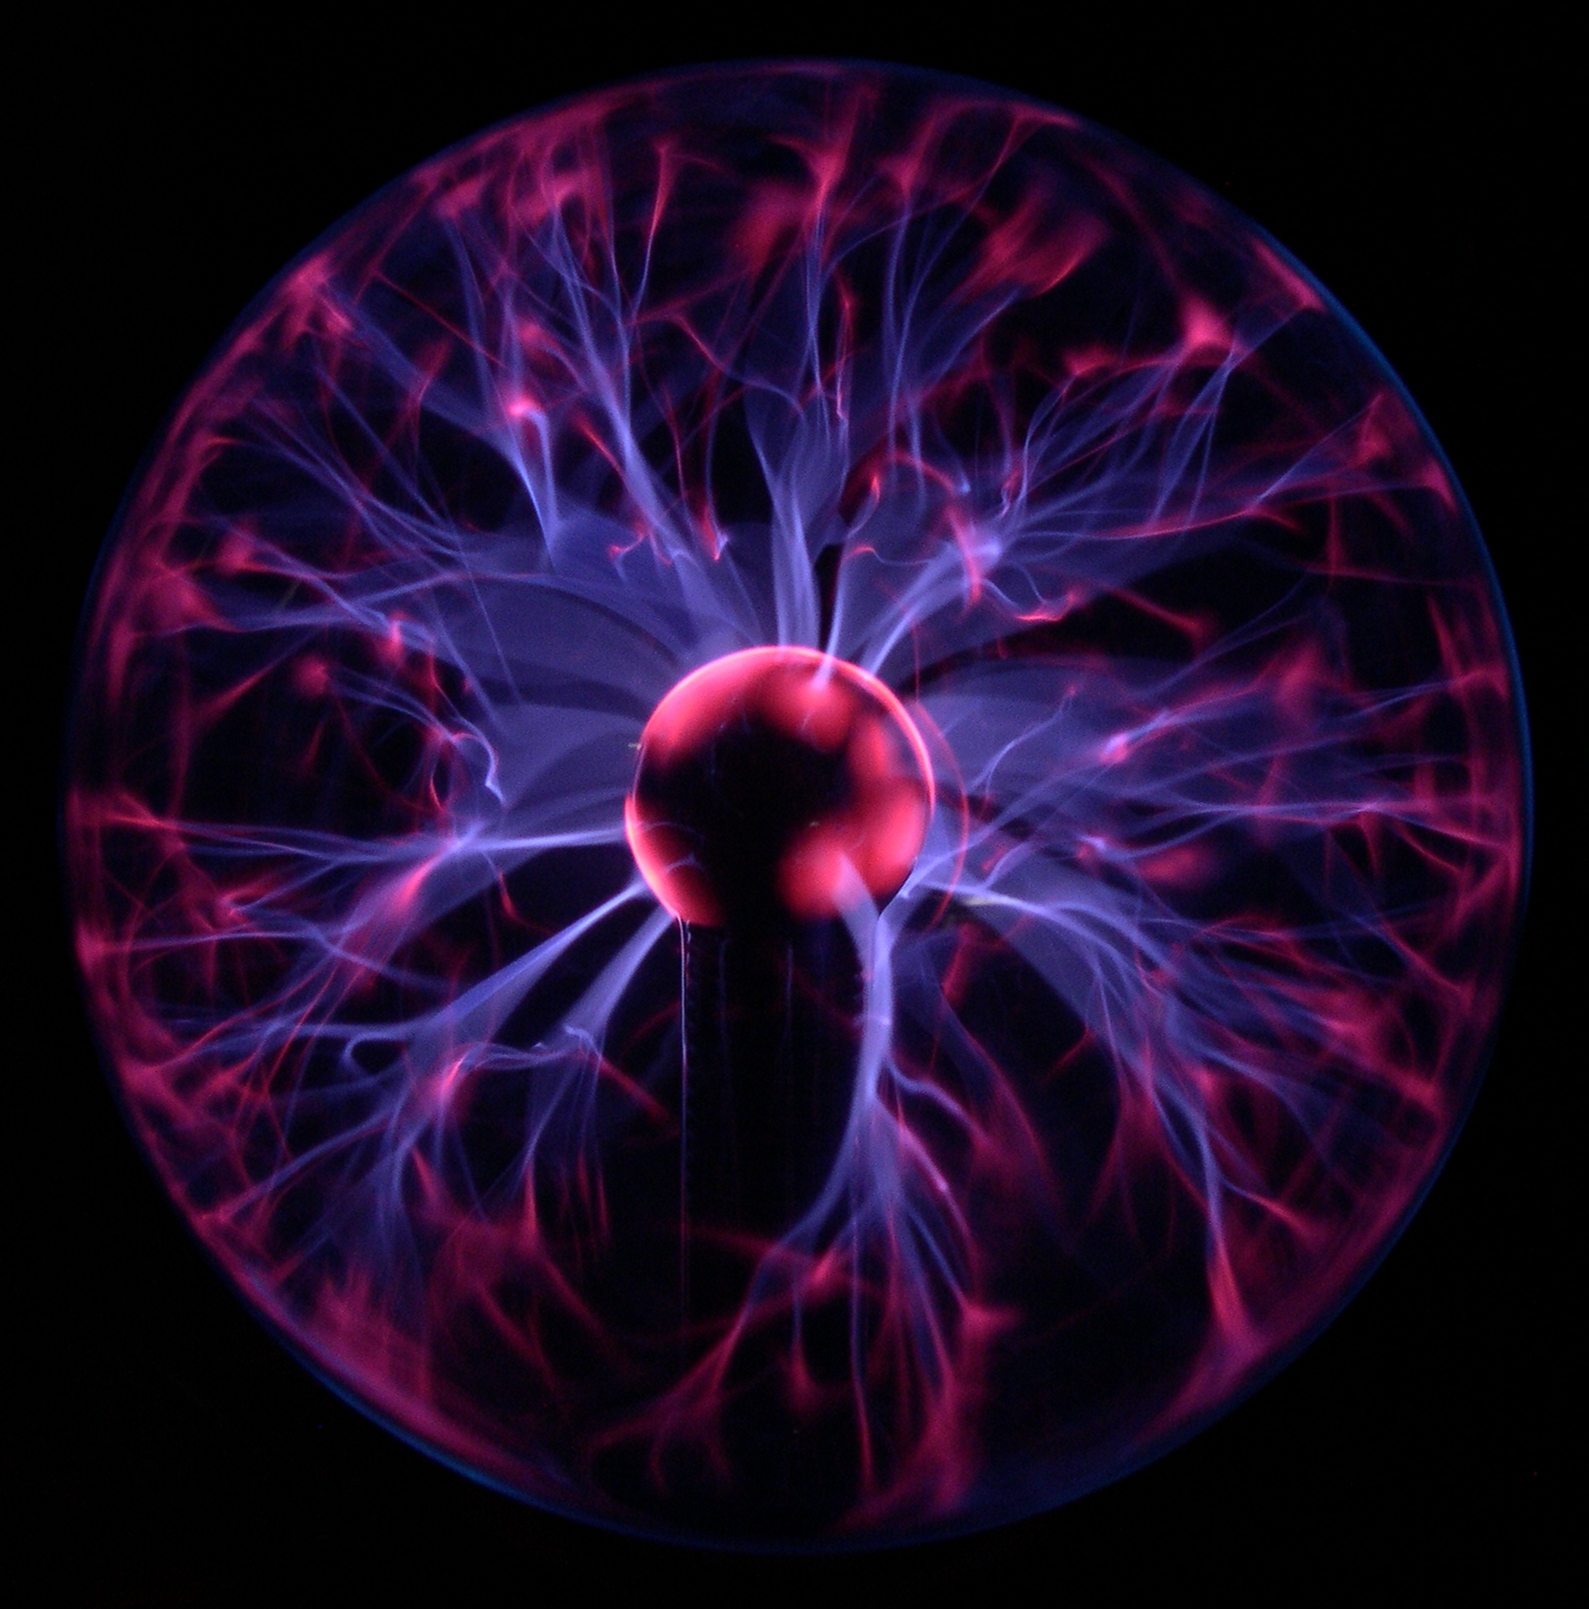
Plasma is a state of matter similar to gas, but obtaining it is not as easy. There are various types of plasma and even more ways to obtain them, but I won't get too much technical. As always, you can educate yourself by following the link to the trusty Wikipedia article. Nevertheless, you might have already come in contact with plasma without knowing it. For example, plasma lamps are in my opinion the cheapest way to generate significant amounts of plasma at home without running unnecesary risks of burning the house down or being killed by imploding glassware.
Plasma lamp
More dangerous than it looks!
Plasma TVs also contain some plasma (duhh) but if it weren't in the name you wouldn't even know it's there.

And why is plasma useful?

As mentioned before, plasma TVs (that provide the best looking picture of all technologies available to the common man.)
Also, metals and other materials can be coated, etched, cut and welded using plasma. (Who wants to melt some rocks?)
Also, fluorescent lamps (I still prefer the oldschool tungsten coil though.)
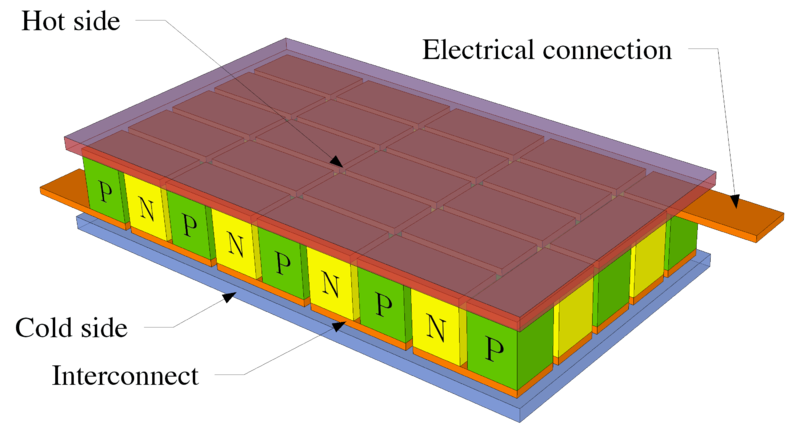
Also, various modern chemical analytical techniques are based on inductively coupled plasma. (This is the kind of plasma i'm wrking with, too.)

You can't immagine a world without plasma, really.

So to obtain plasma you need a strong pulsating magnetic field. For that, you need a pulsating electrical field. Long story short, connect the plug to the wall socket. But not so fast, you will also need a vacuum pump and a chamber where your gas of choice will be rarefied. In a semi-professional laboratory it will look something like this:
Plasma tube with the coil
Close-up of the Tube with some oxygen plasma in it. Note the Coil around it - this generates the necessary magnetic field.
Generator
The Machine. On the left there is a High-Current Electric Generator that powers the Coil. Also note the open-source CubeSpawn frame.

With all equipement provided working with plasma is a walk in the park. I just put a sample of a polymer in the tube, adjust the pressure to the appropriate level, provide some cooling if the things get too intense and then sit back and enjoy the show. After a couple of seconds the process is done and I can move to the next step - figuring out what just happened.

Surface tension and surface energy.

What is this all about? Wikipedia tries to help: "Surface energy quantifies the disruption of intermolecular bonds that occurs when a surface is created." What? Basically, it is a physical property that tells you how strong the drops will hold on to the surface of a given material. The lower the energy, the more the drop will stick to the surface and the more flat it will be (the "flatness" is defined by the contact angle).
Some drops wth different contact angles
Different contact angles correspond to different surface energies.
Bacause drops are usually small (I use 1 µL standard volume), a special instrument is needed for a precise determination of the contact angle. Here comes the goniometer.
Advex Instruments' Surface Energy Evaluation System
This is nothing more than a webcam with a stage where you place the sample and some wheels to adjust the focus. All you have to do is connect the goniometer to a USB port and run the provided software. You can now make some pretty pictures of your droplets, and with a simple point-and-click procedure determine the contact angle.
See Software 6.0
See Software 6.0
Calculating the surface energy from the contact angle is a bit more complex and definitely more boring, so I will spare the details. Furhermore, everything is done automatically. Once I will have a nice large enough set of surface energy data corresponding the different pressures of the plasma and exposure times I will be able to make some pressure- and time-dependency plots. Stay tuned.

Thursday, February 24, 2011

By request: Setting up Google Voice from outside US


wThis does not come under my regular topics but I've received some requests to write an article about setting up a Google Voice Account from anywhere in the world. It can be done both on Windows or Apple OSX. Probably on Linux too, but I haven't tested it.

First of all, you have to have a computer with an internet connection and administrative rights.

After you've met all initial requirements, proceed to step one.

  1. Go to CallCentric.com and sign up for a free account. You can use a fake email addres for this, for example I use the website 10minutemail.com. Enter the requested details and confirm the registration with the new email that you will receive. Agree to the terms (read them if you want) and click "Sign me up". Step one status: done.
  2. If you now log in to your CallCentric account, you will notice your newly assigned SIP phone number in the form of 1777** where ** is a sequence of digits. Write this down or save it to a .txt file for later use. Step two status: done.
  3. Go to phone.ipkall.com and get yourself a real US phone number based on the information from your CallCentric account. I recommend using the same username, email and password for the sake of simplicity. In the field asking for a SIP username, write the previously copied SIP number. In the hostname field write "in.callcentric.com" without the quotes. Step three status: done.
  4. While you wait for a confirmation email from IPKall, download and install Express Talk (available for Windows and Apple OSX). After the installation run the application. You will be asked to fill in the information of your SIP account. Enter the SIP number of your CallCentric account, the same password you used there and for hostname, enter "callcentric.com". (Note how you must not write the in. prefix here. If you do, it won't work.) If all went well, Express Talk should successfully connect to the server and if you go to your CallCentric account, you should see a note saying "Your phone is registered". Step four status: done.
  5. Find a proxy listing site, for example I used this one. Make sure the proxy is using the port 80 and is stationed in the US, otherwise it will probably not work. Assuming you use Firefox internet browser on Windows, to use a proxy you must go to Tools -> Advanced -> Network tab -> Connection -> Settings... Here you select "Manual proxy configuration" and input the proxy IP and port number. Also check the option "Use this proxy server for all protocols". Confirm the settings. To verify that you are successfully connected to the proxy, go to ip-adress.com and it should show your location somewhere in the US. If the proxy doesn't work, try another one from the list. Step five status: done.
  6. Now is the time to finally set up a Google Voice account. While still connected to the proxy go to voice.google.com and log in with your Google account. If it says that Google Voice is unavailable in your country, delete your cookies and try again. If all goes well you should see a frame asking you to choose your very own Google Voice phone number. Search around for a bit until you find a number to your liking. In the next step choose a PIN number and write it down somewhere in case you ever need it. Next, enter your IPKall number that you previously registered, and click "Call me now". Hopefully Express Talk should ring and you can press the required numbers. This concludes the registration. Step six status: done.
The entire process status: DONE.

References:

Saturday, February 19, 2011

Digital thermometer modification: halfway through


Expect loads of pictures!

After I got that idea about modifying a digital thermometer I couldn't stop thinking about it. So I decided to do it right away. First I had to disassemble the thermometer. The procedure is simple and easy, only tool needed is a small flat screwdriver to press some pins and the case opens. The insides can be seen in the picture below.

Digital thermometer parts
1 - two LR44 button batteries; 2 - LCD screen; 3 - case, upper half; 4 - plastic spacer between the LCD screen and the circuit board;
5 - circuit board; 6 - case, bottom half

Next I had to find the correct pair of connections that I could use to determine the temperature. After some testing I found out that I have to connect the + source to the connection marked on the picture below.

the circuit board closeup

Once I soldered all the wires and a female 3.5 jack connector I reassembled everything and the physical work was done. Results:

wiring completed

multimeter measures 1.42 V at 30.8 °C
Multimeter reading is in Volts.
After some experimenting I found out that when temperature increases, voltage drops.

As you can see on the multimeter, I can measure the voltage without any problems. The maximum voltage would be 1.50 V so there is no harm to the computer.
The problem occours when I actually plug the jack into the computer Line-In. Suddenly the voltage drops to about 5 mV and there is no way to increase it back to the previous normal level. Voltage measurement of the computer's Line-In input:

oscilloscope measurement of the Line-In voltage reads 6 mV
No explanation for this yet


If you have any suggestions what might be causing the voltage drop and how to fix it, please let me know.

Digital thermometers


I've been sick and didn't have much strength to think or write. But today I saw some of my chilli plants have sprouted (yeah, I also grow chillis) and I noticed that the temperature in the room was over 33 °C when there was sun shining.
And it got me thinking that every time that I want to do a temperature measurement, I have to look at the tiny LCD display of the digital thermometer, write down the temperature on a piece of paper, and then look at my watch and write down the time the temperature was taken. That's because I only have the cheapest thermometers available, those for $2 off ebay.

a cheap digital thermometer
This is so cheap, you should buy hundreds!

So I decided to do something about it. I want to modify one of these thermometers so I can connect it to my computer and record temperatures automatically. I am not sure how I'm going to do it yet. The most simple option would be to just connect it to the Line-In audio jack and then record the raw voltage input. A more advanced option would of course be the USB connector, but this will most likely require some kind of a driver.

Tuesday, February 15, 2011

A discussion about the flaws of my experiment


I talked about my experiment on a science-oriented forum yesterday and we discussed the possible flaws of my experiment. Several interesting improvements are suggested. I will post here the highlights of the other users' comments and my replies to them.

One of them wrote:
"I'm guessing you did this:
You dripped some water from your fingers directly onto the surface of the peltier device, and it froze.

You then put some water in that small beaker, and place the beaker on the surface of the device. Well, unless your device surface and beaker bottom are absolutely flat, you're going to get somewhat poor thermal conduction. You could coat the interface with some of that thermally conductive paste if you are looking for a better result. It's the same white stuff you may see between the heatsink and the junction on the other side."
True, I first dripped a couple of drops from a 10 mL medical syringe directly onto the surface. This is the most efficient method, but only allows the cooling of very small volumes.
When I tried to freeze the water in the glass beaker, the surface of the beaker is not flat and the thermal conductivity between the beaker and the cooler was poor. Thermal paste would improve the results a bit, but as the glass itself has a poor thermal conductivity, It would still be inefficient. I think a better solution would be that instead of the beaker I use a smaller container with a thin bottom and made of some material with better thermal conductivity, for example aluminium or copper. Thermal paste could be applied as well if needed.


Another point was the inefficiency of the heatsink.
"Is there a fan on the heatsink on the hot side? Are you using that fan? Is it free to move air?"
"Well if I understand your setup photo, your fan is sitting directly on the table surface. That limits its ability to move air."
There is a fan on the heatsink (that I got from an old computer lying in my attic), but a rather small one. I think it has 6 cm in diameter at most. During the experiment  the heatsink was put on top of a large tube that allowed plenty of cool air to reach the heatsink. I am looking for a better heatsink but I don't want to spend money for it, because my resources are limited.

Monday, February 14, 2011

Peltier cooler: DIY part one


So I finally got a peltier cooler from ebay last week. You can buy one for about $5 (depending on postage it could be more). I dropped some water on it while being connected to my PSU (14.5V, 23A) and it froze almost instantly. However, when I tried a larger amount of water (13 mL, a volume of one ice-cube), it never froze. The problem is in the cooler block on the other side, because it's not efficient enough. The whole system overheats after a couple of minutes.

Here is a picture of the setup of the first experiment (PSU not visible):
peltier cooler with heat sink attached
(click to view in full size)

And here is a temperature/time plot of the experiment. Note that temperature is in degrees Celsius.

temperature plot
(again, click to view in full size)

Sunday, February 13, 2011

Hell goo 2


And here is the second blog from the awesome Thijs Boerma.


http://hellgoo2.blogspot.com/


Make sure to check it out if you liked his original project mentioned earlier. I sure can't wait to see what he's come up with this time around. I hope it's even more gross than before.

Peltier coolers: how it all began


I was browsing youtube one day because I was annoyed with my freezer taking 2 hours to turn water to ice. I came along a lot of videos featuring so called "Peltier coolers", which amazed me instantly. For example see this video:

My current project: Peltier cooler


So a little background introduction at first. What are peltier coolers?

Wikipedia says:
"Thermoelectric cooling uses the Peltier effect to create a heat flux between the junction of two different types of materials. A Peltier cooler, heater, or thermoelectric heat pump is a solid-state active heat pump which transfers heat from one side of the device to the other side against the temperature gradient (from cold to hot), with consumption of electrical energy. Such an instrument is also called a Peltier device, Peltier heat pump, solid state refrigerator, or thermoelectric cooler (TEC). The Peltier device is a heat pump: When DC current runs through it, heat is moved from one side to the other. Therefore it can be used either for heating or for cooling (refrigeration), although in practice the main application is cooling. It can also be used as a temperature controller that either heats or cools."
Here's a diagram of a thermoelectric cooler.

(click on the image to view labels)

Hell goo


I just remembered a blog about a guy who kept a world of living goo in a jar for over a year. Mold, dead animals and stuff. Aweseome stuff. Too bad he stopped updating it though. If anyone is interested check it out here: http://hellgoo.blogspot.com/

A pic of his experiment:

So this is it


This is where I'll be writing about my science projects. Feel free to comment on them and post ideas.

Just a list so you know what to expect:

  • Magnetic stirrer
  • Peltier cooling systems
  • Chemistry general
  • Tons of other cool stuff