After I got that idea about modifying a digital thermometer I couldn't stop thinking about it. So I decided to do it right away. First I had to disassemble the thermometer. The procedure is simple and easy, only tool needed is a small flat screwdriver to press some pins and the case opens. The insides can be seen in the picture below.
 |
| 1 - two LR44 button batteries; 2 - LCD screen; 3 - case, upper half; 4 - plastic spacer between the LCD screen and the circuit board; 5 - circuit board; 6 - case, bottom half |
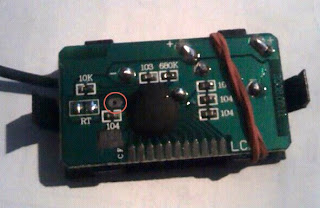
Next I had to find the correct pair of connections that I could use to determine the temperature. After some testing I found out that I have to connect the + source to the connection marked on the picture below.
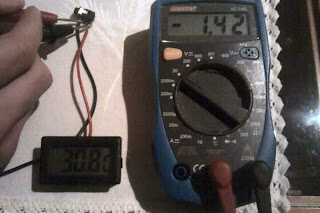
Once I soldered all the wires and a female 3.5 jack connector I reassembled everything and the physical work was done. Results:
 |
| Multimeter reading is in Volts. After some experimenting I found out that when temperature increases, voltage drops. |
As you can see on the multimeter, I can measure the voltage without any problems. The maximum voltage would be 1.50 V so there is no harm to the computer.
The problem occours when I actually plug the jack into the computer Line-In. Suddenly the voltage drops to about 5 mV and there is no way to increase it back to the previous normal level. Voltage measurement of the computer's Line-In input:
 | |||
| No explanation for this yet |
If you have any suggestions what might be causing the voltage drop and how to fix it, please let me know.


cool!
ReplyDeleteamazing! i wish i had enough time on my hands to do this!
ReplyDeletei'm not that good in this stuff, but i'm sure u will figure it out!
ReplyDeleteWow that looks really cool. I hope it works out.
ReplyDeleteThat looks cool! Following so I can keep up with all the nifty science stuff. Might give me ideas on what kind of little projects to do with my kids
ReplyDeleteMy cousin recommended this blog and she was totally right keep up the fantastic work!
ReplyDeleteCoffee Thermometer